When performing a building inspection, whether for the sale of a building, a rental, homeowner’s insurance purposes, or any other situation that calls for such a check, it is important that any potential water damage risks are properly identified so they can be remediated.
Over time, damage from excess moisture can cause numerous problems, such as:
-
Warped, cupped, or buckled flooring.
-
Mold infestations.
-
Dissolution of drywall.
-
Attraction of pests (rodents, roaches, termites, etc.).
The above are just a few examples of the problems that can crop up over time as water damage progresses in a structure. So, as a building inspector, it is important to be able to track down moisture intrusion risks quickly and reliably.
As a building inspector, how can you make sure that you don’t miss a major source of moisture that can cause problems later for the building’s occupants? Using moisture meters to search for moisture in a structure is a great place to start. However, to get the most out of using moisture meters for this task, there are a few things that you need to know. With this in mind, we here at Delmhorst wanted to provide a few tips for using moisture meters for building inspections.
Choosing a Moisture Meter for Building Inspection
Before you can start using a moisture meter to inspect buildings, you have to get your hands on one. There are many different makes and models of moisture meters out there, which can be broadly divided into two types based on their method of operation:
-
Pin Meters.
-
Pinless Meters.
 Pin meters use two or more electrodes to penetrate a material sample, then send an electric current through the material and measure the amount of resistance to the current to provide a moisture content reading. Pinless meters, on the other hand, use electromagnetic waves to “scan” a material and measure the fluctuations in said wave to generate a moisture content reading.
Both types of moisture meter have their unique advantages and limitations compared to the other. For example, pin meters are able to pinpoint the exact depth at which a moisture pocket occurs, while pinless meters are better at scanning larger areas quickly (and pinless meter don’t leave pinholes).
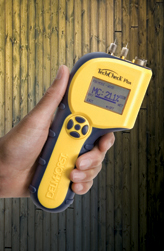
However, the meters don’t have to be mutually exclusive. A common best practice for building inspectors is to carry both kinds of moisture meters on the job. Alternatively, some building inspectors use a composite meter device that combines the functionality of both pin and pinless meters into a single tool. Delmhorst’s own TechCheckPlus 2-in-1 meter is an example of such a device.
When choosing a moisture meter or set of moisture meters, look for the ability to make species corrections for different varieties of wood, %MC range, and other functions such as drywall or reference scale settings for testing non-wood materials. These capabilities can help make your task easier, and your readings more reliable.
Using Moisture Meters on the Job
After you acquire your moisture meter(s), you can get started on testing for moisture in a structure. If you are using two different meters, you can use the pinless meter to quickly scan large areas, and use the pin-type meter to pinpoint the depth of the moisture pocket when one is found.
You may also want to use pinless meters in areas of the building that are “finished” so as to avoid leaving pinholes in assembled wood flooring or in drywall.
When checking a structure, stay alert to any musty odors in the air. Musty odors are often an early warning sign of a mold infestation. If you smell such odors, pay special attention to the rooms/areas near where you caught the scent, as there may be a mold colony nearby.
 While a pinless meter is great for scanning large areas of a structure quickly, it needs a solid, flat surface that can accommodate the entirety of the scanning plate to work. Also, the material being scanned needs to be thick enough to match or exceed the scanning depth of the pinless meter. If the material is too thin or shallow, your readings will be thrown off.
For testing thin materials such as drywall, or loosely-packed materials such as insulation, a pin meter will work much better than a pinless one. Note that you will probably need extended-length probes for testing insulation, as standard-length pins are too short for such purposes, especially when the insulation in question is still behind a wall.
As you test the building’s materials, be sure to check any walls, floors, and ceilings along the path of any plumbing in the structure, as old or damaged pipes are a common source of moisture intrusion. Studying the building’s blueprints can be an enormous help in isolating the location of plumbing pipes in the building.
Other areas to pay special attention to include:
-
The basement (if one exists).
-
Walls along the outside edge of the building.
-
The foundation.
-
The attic.
-
Window frames.
-
Door frames leading to the building’s exterior.
By making a thorough check of the structure with a moisture meter to reveal water damage risks, you can ensure that your clients have the information that they need to strengthen their bargaining position during sales/rental negotiations or to prevent catastrophic damage to the structure by nipping a problem in the bud.
Learn more about moisture meters and how they can help detect problems by checking out the restoration guide at the link below, or by contacting Delmhorst today.