
 As we near the end of the winter season and temperatures across the country start to return to non-freezing values, there’s a particular moisture intrusion problem that home and business owners across the country are going to have to deal with: snow melt moisture intrusion.
Ensuring that a building is safe and secure from moisture damage caused by snow melt can be difficult, especially when you’re handling it as a Do-It-Yourself project. One of the most basic tasks in preventing moisture damage from snow melt is detecting the presence of moisture in the first place, which can often be difficult to do with the naked eye alone.
This is where moisture meters can be of help. With a moisture meter, detecting and quantifying the amount of moisture present in various building materials is quick and easy, if you know how to use one.
So, to help you with the task of detecting snow melt moisture intrusion, here are a few tips for using a restoration moisture meter to detect snow melt.
1: Picking the Right Meter for the Job
If you don’t already have a restoration moisture meter, it’s important to pick the right one for your moisture testing needs. In many cases, a pinless moisture meter can be used to very quickly scan building lumber at key points to determine if an excess amount of moisture is present or not.
However, some building materials, such as insulation, might be better checked with a pin-type meter that has extended-length probes. This is because insulation is a loosely-packed material that cannot provide a solid scanning surface for a pinless meter’s scanning plate.
2 in 1 combination meters can provide the benefits of both meter types, but are usually very costly compared to a simple pin-type meter.
2: Checking Spaces Near the Roof
Whether you have a pin-type meter or a pinless one, it’s important to start your check for snow melt intrusion in the spaces closest to your building’s roof. Why?
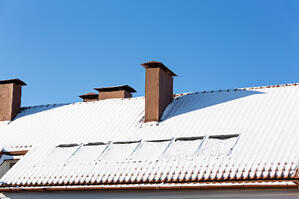
During the winter, snow tends to collect on rooftops in vast quantities, putting pressure on rooftop materials. Additionally, if the space between your rooftop and the rest of the building is warm, there is a risk that the bottom layer of snow can melt and refreeze into solid sheets of ice. When this ice falls off of the roof, it can take roofing materials with it, creating vulnerable points where moisture can get into the building.
Checking lumber materials in the attic or in crawlspaces between the roof and the main structure is important for finding potential points of moisture intrusion. For best coverage, check near any joists and along any windows or other openings that may be present in this space. Also, if you have a pin meter with extended-length probes, be sure to check your insulation for signs of moisture intrusion.
If your restoration meter isn’t calibrated for checking insulation, try running the meter in reference mode (if available) to get a qualitative check of moisture in insulation.
3: Checking Along the Walls Adjacent to the Exterior
Aside from the roof area, another major source of snow melt moisture intrusion can be along the building’s outer wall near the foundation. It’s common for snow to collect along the ouside wall of a building and just sit there until it melts.
If enough snow is allowed to collect alongside the building’s walls and melt, the effects are similar to what you might see during a flood event, with water seeping into the foundation or between the foundation and the base of the outer wall.
Here, a specialized moisture meter probe that has large, flat blades for checking under the trim along your wall can be helpful in getting a good reading of the moisture conditions between your walls and flooring along the outer edge of the building.
If you’re using a pinless meter, you can remove your baseboard trim and take a reading of the moisture content of your wall near the flooring. This can be labor-intensive as you’ll have to remove and replace sections of your base trim, but it can be worth it to find out if there’s a significant amount of moisture seeping into the building.
4: Safety First!
Finally, when you’re preparing to check for moisture intrusion in attic crawlspaces or other areas of the building, be sure to take a few basic safety precautions:
- Wear Protective Equipment. If you’re going to be working with or near fiberglass insulation, be sure to wear gloves and goggles at a minimum to protect your hands and eyes. If your attic environment has a lot of particulate dust in the air, consider wearing a safety mask to filter out the worst of the particulates.
- Get Help. When climbing up high ladders into the attic, be sure to have someone else there to help you keep the ladder stable and to provide assistance in an emergency.
- Avoid Placing Weight on Moisture Compromised Structural Supports. If you detect an abnormally high moisture content in a piece of roofing lumber in the attic or rooftop crawlspace, do not place your weight on it. Excess moisture can decay wood building materials, weakening them so that they might give way under stress.
By following a few basic safety guidelines, you can make DIY moisture intrusion detection much safer for yourself.
Comments